CD-i meets Bluetooth
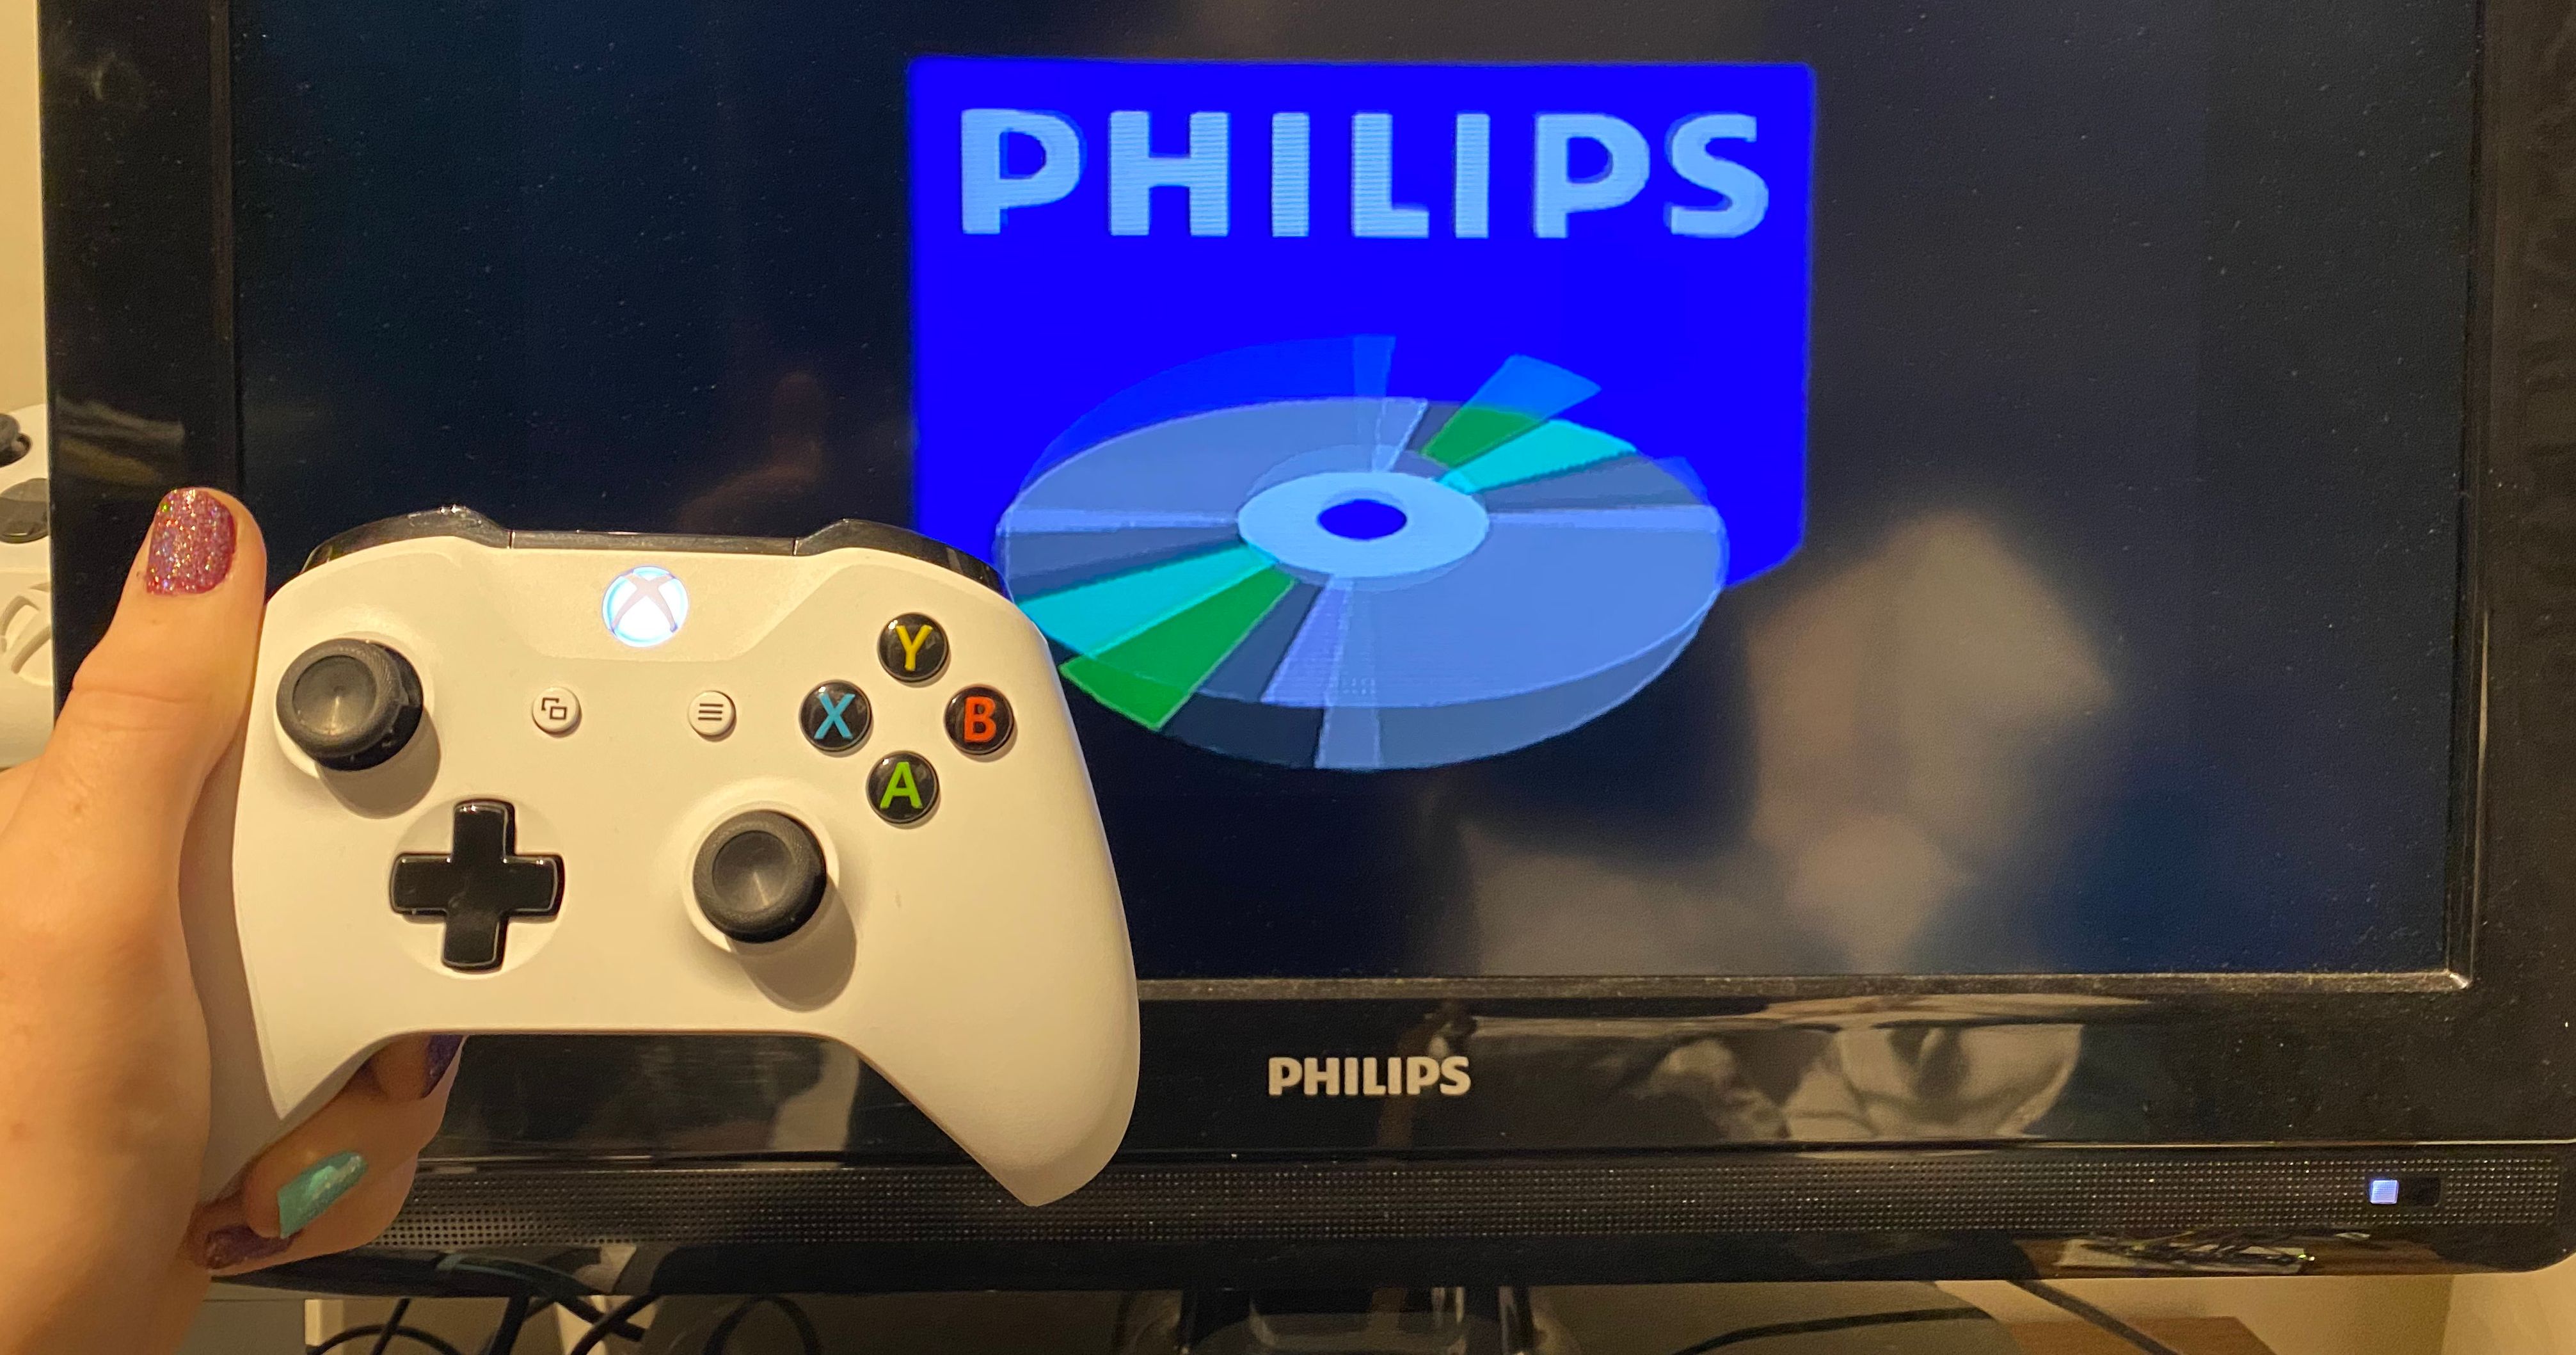
Philips CD-i. Enough said for some to either bring back traumas or joyful memories. I never had a CD-i in my life but I did have a facination for it as a weird misunderstood device that existed in the past. It barely became any success except where it was made: Belgium, The Netherlands, and a tiny bit in the UK. Recently I got my hands on a CD-i 210 /00 model from a good friend on mine who repaird a few “throwaway” units into a clean and working device with a replacable clock battery.
Controlers however he didn’t have, and the 2nd hand market asks just too much for them. Initially I used the SNEStoCDI project. However it has me fustraded, as the CD-i had a cursor (yes cursor) to control the UI and a D-pad then was used in games… The project works around it with speed settings but it just isn’t as good as a joystick would be… Exactly that phrase got me thinking. I do have 2 controllers here which have joysticks… and a D-pad… The XBOX one controllers! I just need bluetooth to connect them…
Arduino Nano 33 IoT
The original plan I had in my mind was to use one of my ESP32 devboards I have on my desk for my teaching… However I laid my eyes on the Bluepad32 project as it could support way more than one controller model (Wii to CD-i anyone??), but as it is the weekend I prefer the Arduino framework. The two would not work nicely together. Change of plan… The Arduino Nano 33 IoT is also in my collection, this device has two microcontrollers in effect. The WiFi/Bluetooth NINA chip I could flash Bluepad32 to and then continue my work on the CD-i conversion in almost any tool I would want to use ond the Atmel SAMD chip. I also is affordable and easy to get so others could use my work as well.
Flashing the NINA
Well we got to flash the Bluepad32 directly to the NINA chip. To do this we are going to do the following steps
- Install the WiFiNINA library
- Open the SerialNINAPassthrough WiFiNINA Example sketch
- Compile and upload the sketch
- Download Bluepad32 v2.5.0 for NINA
- Untar it
- Follow the README.md, following steps are for Ubuntu
wget https://gitlab.com/ricardoquesada/bluepad32/uploads/41a85acb147b3e927fea6b8659dfe97e/bluepad32-nina-2.5.0.tar.gz
tar -xvf bluepad32-nina-2.5.0.tar.gz
cd bluepad32-nina-2.5.0
sudo apt install esptool
esptool --port /dev/ttyACM0 --baud 115200 --before default_reset write_flash 0x0000 bluepad32-nina-full-2.5.0.bin
Now we are ready to return to the Arduino code!
Flashing the main code
All code is available on GitHub! You can find it at https://github.com/meyskens/CDIBluetooth. Once you cloned it import it in PlatformIO. This will set up all Arduino tooling and libraries up for you! You can then compile and upload the code to the Arduino Nano.
The wiring
The CD-i uses a 8-pin mini DIN connector, cables can be easily found!
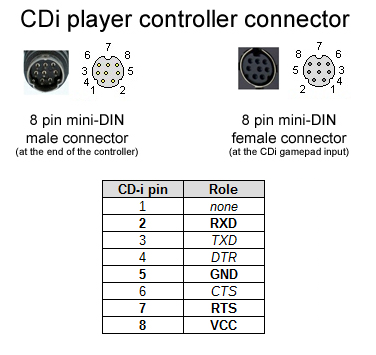
The connector has 8 pins to do serial connection, we only need RXD and RTS as the CD-i does not send data back to us. We will use the 5V and GND pins for level shifiting and powering the Arduino.
Because the CD-i outputs ~5v and the Arduino Nano IoT works 3.3v we need to use a level shifter. This will also isolate the two devices from each other, the CD-i serial spec changed over device revissions we better stay safe this way. A simple shifter can be found quite cheap at your local Chinese website or from our open source friends at Sparkfun.
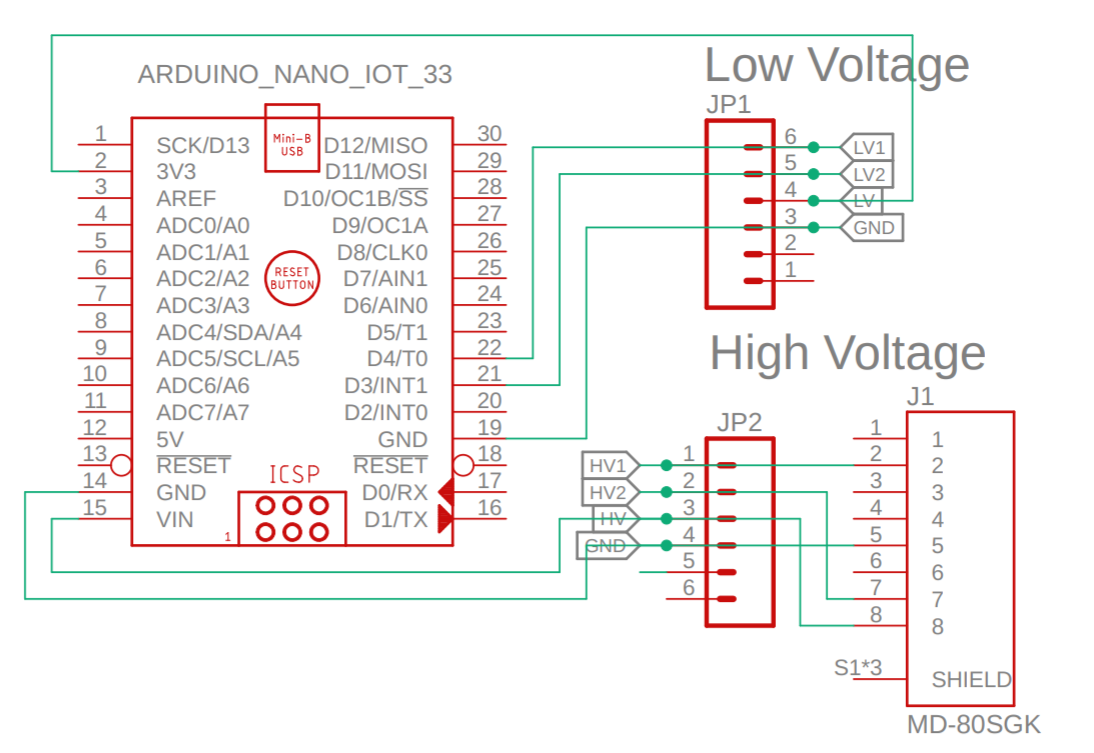 Big thanks to Victor Welters for the schematics!
On the Arduino Nano I used pin D3 for RTS and D4 for RXD, these however can be changed! If you want to use it without a PC (so after debugging) you can connect the CD-i 5V to the VIN and GND to GND so the CD-i powers your Arduino. This works on my CD-i 210 /00, but I have not tested it on other CD-i units (will be updated as soon as Jorne can confirm my prototype works on all models).
Usage
Once it is all set up it is simple, boot the CD-i then plug in the Arduino’s DIN into the controller input as well as the USB into power (if you didn’t connect the 5V pin). Pick up your favorite Bluetooth controller and put it into paring mode, the Arduino will connect to it (can take up to a minute I noticed) and you are ready to go!
Backstory
Okay now time for real fun… One prototype that was stupid, the next one was haunted and the last was magic!
Prototype 1
My research was done… I had my Arduino ready, Bluepad flashed and I had immediate readouts. The day was good. I planned to use the same setup as SNEStoCDI which I had on an AVR-based Arduino Nano. However… SoftwareSerial does not work on the SAM architecture… Quickly rewrote the code to use built in SERCOM functionality… Plugged it into the CD-i… nothing. I also read no data on my scope (okay it was not my good one, i forgot where I put that one). Rewrote the code again to use the hardware serial, re-soldered the connector and… nothing again. But one win that evening I saw data passing by!
Then I notided the original developer noting “for some reason hardware serial does not work”.
Some reason indeed… I quickly turned to the CD-i discord server for help! TwBurn noted that the CD-i swaps voltages compared to the Arduino so it will not work. But pointed me to the cdi-controller-library which he had made!
Prototype 2
With a new library that handled the Serial for me (as well as buttons, which yeah I already wrote code for but not as good and tested!) life was bright! Being home early due to a storm I went to my soldering iron and made a prototype board. Might have been a mistake… but it was out of my control. I knew exactly what pins I had to use and with my debugging adventures I wanted solid connected wires.
“The poor-womans PCB”
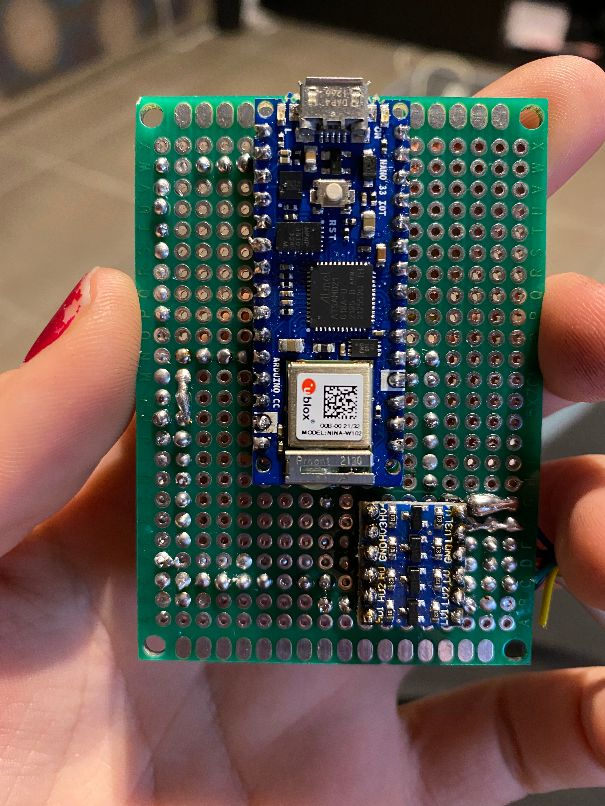
Not my best work but hey!
Now the code… While cdi-controller-library does not use SoftwareSerial it does use AVR specific code for timers! So I had to fork the library and rewrite it using Adafruit’s ZeroTimer library that leveages SAM hardware timers. Lots of shouting at C code but for some reason it works from first try! (I will backport changes to cdi-controller-library once it has had more testing).
Code flashed, time to test it out!
I plugged the cable into the CD-i and the serial monitor on my laptop closed… oh no! Plugged out of the CD-i, and the Arduino boots. I plugged it in and gone. Okay you all know what happens here right… Quickly unplugged the USB and got my multimeter out to check the connections. Okay 5V from the CD-i… I had a signal on the level shifter… then I measured the other side of the level shifter expecting 0V. Euh 5V… must me me… measured it compared to a GND pin on the Arduino… 5V!!! Turned it around and saw the light turn on… Yikes unplugged it immediately…
I still don’t know what went wrong but I suspect the level shifter was broken in some way as it did not isolate the devices at all!
Prototype 3 = final
Compiling code… check! No hardware… Okay I started from scratch again… Pulled out a breadboard and a new logic shifter (past me really ordered a lot…).
This time I tested the logic shifter before I connected it to the Arduino. 0V everywhere on the other side, 5V on CD-i side… good!

Back to my desk connecting wires, setting them in my code. Flashed firmware… and…
BINGO! Okay I did make like 3 coding mistakes and didn’t even start on joysticks but it works!
Back to the PC, after a few iterations I had the joysticks set up, all buttons mapped OK. I now have a full working CD-i controller with Bluetooth. In a last test I was even able to power it fully from the CD-i so it turns on and off along with it (as if it was made for it).
Philips never made a joystick “controller” and the joysticks on the origianal remotes are super hard to find (and overpriced). This gives the CD-i community another ability to keep using the CD-i with a good controller experience! I tested it with my Xbox controller but it works with many more!
The PCB!
The CD-i community has amazing people keeping this weird 90s tech alive and even developing new games! I am working with a friend to release a PCB to connect this console to the Bluetooth world that is just plug and play! All designs will be open source and I hope to be able to sell them at a low margin to the community giving back the profits to all contributors who helped me out! Hope to be able to update this page with more info in the future!
Update 2022-04-08: The Startup
The past few weeks had been crazy looking back to it… We designed a PCB, produced a prototype batch. Tested in well. Prepared packaging, shipping, assebly, a website. Toghether with two close friends: Jorne Marx and Victor Welters we made a crazy idea into a full product. We shipped our first units to contributors and testers. Now we are ready to accept our first batch of orders!
The final product is now available at cdibluetooth.com!